%20--%3e%3csvg%20version='1.1'%20id='Layer_1'%20xmlns='http://www.w3.org/2000/svg'%20xmlns:xlink='http://www.w3.org/1999/xlink'%20x='0px'%20y='0px'%20viewBox='0%200%201440%20384.8'%20style='enable-background:new%200%200%201440%20384.8;'%20xml:space='preserve'%3e%3cstyle%20type='text/css'%3e%20.st0{fill:%23010101;}%20%3c/style%3e%3cg%3e%3cpath%20class='st0'%20d='M156.5,162.6c0,32.3-14.1,52.7-42.3,61.1l51.3,71.2h-42.1L76.6,229H33.1v65.9H0v-196h72.9%20c29.9,0,51.3,5,64.2,15.1C150,124.2,156.5,140.3,156.5,162.6z%20M112.5,190.3c6.7-5.8,10.1-15.1,10.1-27.9c0-12.8-3.5-21.6-10.4-26.4%20c-6.9-4.8-19.3-7.2-37-7.2H33.1V199h41.2C93,199,105.7,196.1,112.5,190.3z'/%3e%3cpath%20class='st0'%20d='M407.1,124.7c-9.6,0-17.5,2-23.7,5.9c-6.2,3.9-9.3,9.9-9.3,17.8c0,7.9,3.1,14,9.3,18.2%20c6.2,4.2,19.3,8.7,39.4,13.6c20.1,4.9,35.2,11.7,45.4,20.5c10.2,8.8,15.3,21.7,15.3,38.8c0,17.1-6.5,31-19.3,41.6%20c-12.9,10.7-29.8,16-50.8,16c-30.7,0-57.9-10.6-81.6-31.7l20.8-25c19.8,17.2,40.4,25.8,61.7,25.8c10.7,0,19.1-2.3,25.4-6.9%20c6.3-4.6,9.4-10.7,9.4-18.2c0-7.6-2.9-13.5-8.8-17.7c-5.9-4.2-16-8-30.4-11.5c-14.4-3.5-25.3-6.6-32.8-9.5%20c-7.5-2.9-14.1-6.7-19.9-11.4c-11.6-8.8-17.4-22.2-17.4-40.4s6.6-32.1,19.8-41.9c13.2-9.8,29.5-14.7,48.9-14.7%20c12.5,0,25,2.1,37.3,6.2c12.3,4.1,23,9.9,32,17.4l-17.7,25c-5.8-5.2-13.7-9.5-23.6-12.9C426.5,126.4,416.7,124.7,407.1,124.7z'/%3e%3cpath%20class='st0'%20d='M690.2,98.9V130H585.6v51.9h93.9v29.4h-93.9v52.4h108v31.1H552.5v-196H690.2z'/%3e%3cg%3e%3cpath%20class='st0'%20d='M868.7,250.3l-19.6,44.6h-35.3l86.4-196h35.3l86.4,196h-35.3l-19.6-44.6H868.7z%20M953.4,219.8L917.8,139%20l-35.6,80.8H953.4z'/%3e%3cpath%20class='st0'%20d='M1233.6,162.6c0,32.3-14.1,52.7-42.3,61.1l51.3,71.2h-42.1l-46.8-65.9h-43.5v65.9h-33.1v-196h72.9%20c29.9,0,51.3,5,64.2,15.1C1227.1,124.2,1233.6,140.3,1233.6,162.6z%20M1189.6,190.3c6.7-5.8,10.1-15.1,10.1-27.9%20c0-12.8-3.5-21.6-10.4-26.4c-6.9-4.8-19.3-7.2-37-7.2h-42.1V199h41.2C1170.1,199,1182.8,196.1,1189.6,190.3z'/%3e%3cpath%20class='st0'%20d='M1380.5,129.2v165.7h-33.1V129.2H1288V98.9h152v30.3H1380.5z'/%3e%3c/g%3e%3cg%3e%3crect%20x='234.9'%20y='0'%20class='st0'%20width='29.1'%20height='384.8'/%3e%3c/g%3e%3c/g%3e%3c/svg%3e)

Every great photograph deserves to be proudly displayed. And yet, so many of our beloved shots end up lying around the house, our walls bare. While framing photography may seem simple, there is a real craft to finessing wall composition, making your image shine, and mounting it in the first place. Here are several tips to help you get it right.

Get the look with photography by Martin Thompson
Framing Photography: Top Tips
Select Your Photograph First
Learning how to frame your art need not be stressful. A safe place to start is - perhaps unsurprisingly – the foundations! Begin by selecting your artwork. It may seem obvious, but we often know we want to frame something before knowing what we want to display. We end up with a frame and all the tools but no photograph to exhibit. You want to match your frames to your artwork, not the other way around.
Remember: The mount needs to magnify the work, not take over from it.

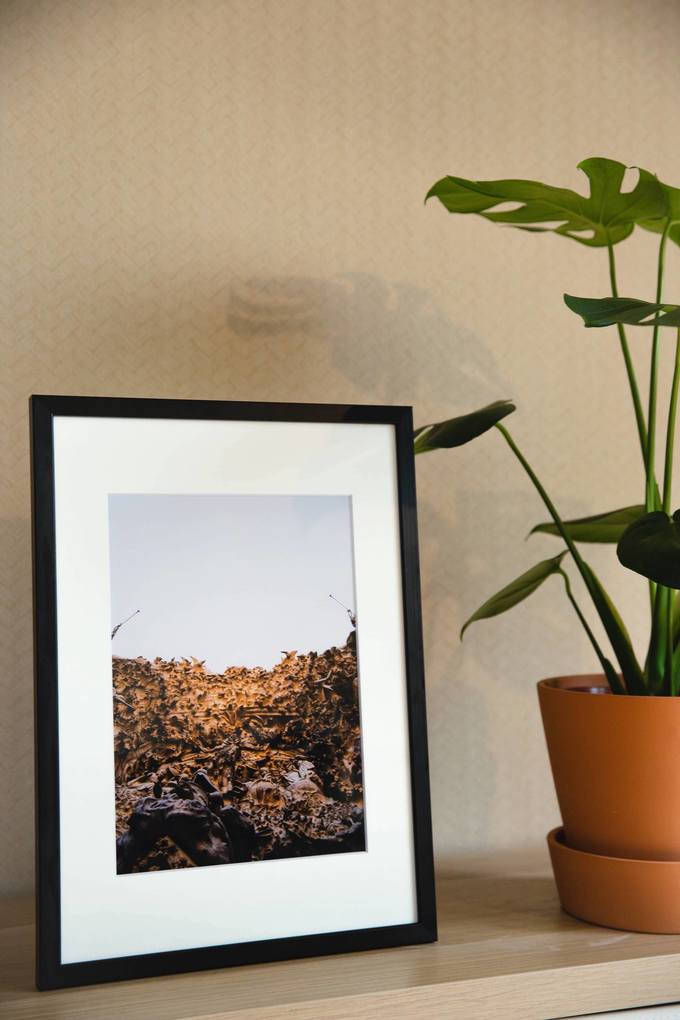
Artwork by Gina Soden (courtesy of the artist)
Choose Your Frame
Now we know that the frame needs to enhance and support the image: what comes next? Choose frames with colours that complement those in the photograph or mirror the decor of your space. For black-and-white photography, consider black or grey frames or, for something a little more eccentric, a rich red or brilliant blue to create contrast.
Not sure where to find your frames? Thrift stores, charity shops and vintage markets always conceal hidden gems just waiting to be discovered. If purchasing from galleries or studios, you can often acquire the image ready-framed. Don't hesitate to ask!

Get the look with photography by Pedro Correa
Consider Frames With a Mat
To give your photograph that work-of-art feel, seek out frames that come with a mat. Mats are pieces of cardboard that enclose the image, separating the artwork from the frame-border. That little bit of space might not seem like much, but it can impress your artwork with an extra touch of class and elegance. You can tape the photograph onto the mat (do not use duct tape or tapes that could risk tearing the work) and then place the frame over the top.
Remember: You will need to do a little measuring to make sure your mat and frame are big enough to give your image space to take centre stage. The amount of space you leave between border and image is down to personal preference. That said, we recommend making sure that the gap is at least a couple of centimetres to have the most impact – increasing and decreasing this in alignment with the size of your piece.
How to Handle Your Photograph
When framing your chosen piece, especially when using glass frames, try not to touch the glass or the image itself. Pick up the glass and the print via the edges. Make sure that your hands are clean so you don't leave any oily smudges, too.
Get the look with photography by Eleanor Cunningham
Create your display
The finishing touch: how to display your photograph? There exist a tonne of ways you can present your artwork, from exhibiting a selection along your shelves to curating a classic gallery wall with alternative frames and pictures. You could even dangle your prints with binders or bulldog clips along your wall mantle.
We know – would it not be easier to just stick it up on the fridge door? Perhaps. But that won't be half as rewarding. Now, let's get creative.